As an Amazon Associate, we earn from qualifying purchases. Some links on this site are affiliate links at no extra cost to you. Our recommendations are based on thorough research and editorial judgment.
Why Garage Organization Content Is Growing in EV Search Trends
We see more garage‑organization content because EV owners must meet code rules, keep charging zones safe, and avoid clutter. 1) We outline a charger footprint and keep clear space for vehicle movement. 2) We add a dedicated 240 V circuit, GFCI protection, and label the panel. 3) We maintain 3‑ft clearance from flammable items and install ventilation. 4) We use modular wall systems and cable trays to keep tools and cords organized. 5) We plan for future upgrades with spare panel slots. Follow these steps to stay compliant and efficient, and the next sections will show how to expand the setup.
Key Takeaways
- EV owners need dedicated charger zones to keep floor space clear for vehicle movement and parking.
- Installing a 240 V, 40‑amp dedicated circuit with GFCI protection drives demand for electrical‑panel planning content.
- Safety codes require clearances, fire‑rated wiring, and thermal monitoring, prompting more guidance on compliance.
- Efficient storage and cable‑management solutions, like modular walls and trays, are essential to prevent clutter near chargers.
- Mechanical aids (hoists, conveyor systems) and ventilation planning are increasingly discussed to support larger, high‑power EV setups.
Why EV Chargers Are Driving Garage Organization Trends?
You may be interested


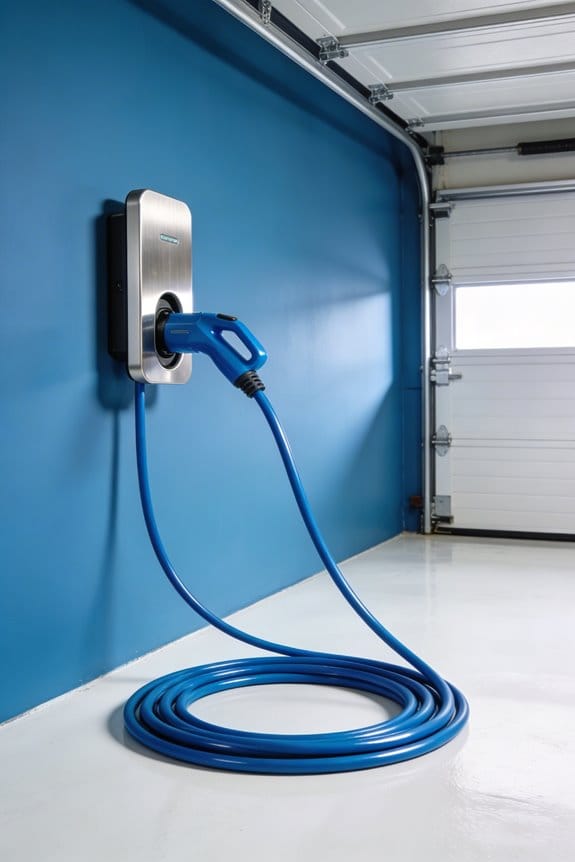
Ever notice how adding an EV charger to your garage feels like moving a piece of furniture you didn’t even know was there? Suddenly you’ve got a new “no‑go” zone, and the whole layout has to shift around it. The charger itself needs space to stay clear for safety, and the way you store tools and seasonal stuff has to change, too.
First thing you’ll want to do is map out the charger zone. Grab a piece of tape or a marker and outline the area on the floor. That visual cue makes it easy to see where you can’t park a car or stack boxes. Next, think about where you keep your storage racks. Put them as far from the charger as possible—ideally along the opposite wall. This keeps cords and plugs out of the way and helps you avoid tripping hazards.
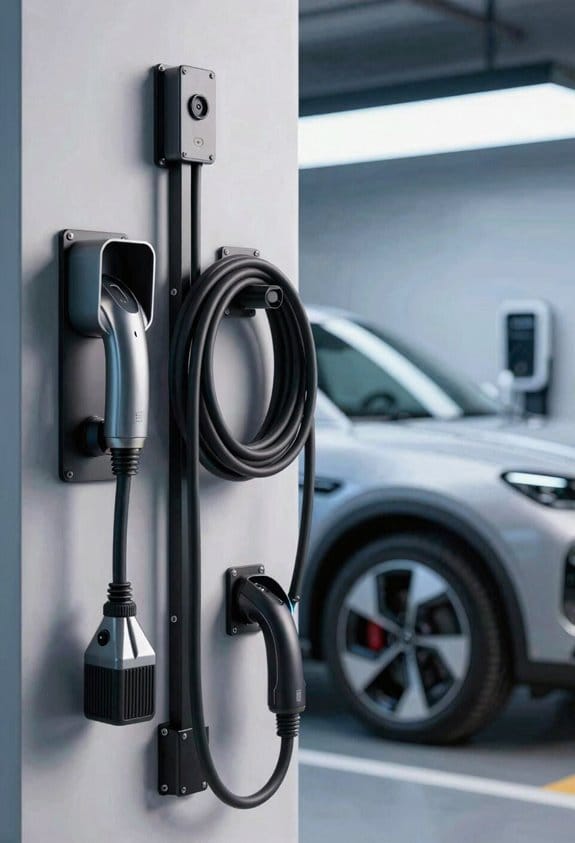
Wall‑mounted shelves are a lifesaver for tools. They free up floor space and keep everything you need at eye level. If you have a lot of garden gear, a sturdy pegboard right next to the shelves can hold hoses and rakes without crowding the charger. And don’t forget a dedicated cable tray. Running the charger cord through a tray keeps it neat and protects it from wear and tear.
- Keep the floor clear for vehicle movement.
- Group seasonal items in a separate corner.
- Label zones for quick identification.
These simple steps let you keep the garage functional while you get used to the new charging routine. Frankly, once you’ve set up the zones, you’ll find it easier to keep the space tidy and safe.
Try this: start by drawing a rough sketch of your garage on a napkin, then place the charger zone, storage racks, and shelves on the paper. Adjust the layout until everything feels balanced, then bring that plan to life.
Do you ever feel like your garage is a never‑ending puzzle? With a bit of planning, you can make the charger fit without sacrificing storage or safety.
What’s the one thing you’ll move first to make room for your new charger?
Recommended Products

Color: Starfire White Metallic over Peppercorn Grey Frame

Set Includes: 4x Multi-Use Lockers, 2x Rolling Tool Drawer Cabinets, 2x 2-Door Base Cabinets, 4x Wall Cabinets, 2x 48 In. Bamboo Worktops and 2x 48 In. Backsplash Kits

Includes: 2x Multi-Use Lockers, 2x Rolling Tool Drawer Cabinets, 2x Two-Door Base Cabinets, 4x Wall Cabinets, 2x 48" Bamboo Worktops, 2x 48" Backsplash Kits, 2x 12pc Hook
Electrical‑Code Requirements for Garage EV Charging & Storage
Ever wondered why your garage feels cramped when you try to set up an EV charger? You’re not alone—many homeowners hit the same snag. Below is a down‑to‑earth walk‑through that helped me get my charger installed without a hitch.
Recommended Products

THE BRAND YOU TRUST – Leviton has been in homes for over a century and electrifying vehicles for over a decade. Charge at ease with UL/Energy Star Certified stations supported by a 24/7 dedicated team

Versatile Charging Capability: The EVEMS240-200 (for 125A -200A Services) supports diverse EV charge rates including 20/24 Amp (4.8/5.7KW), 30/32 Amp (7.2/7.68 KW), 40 Amp (9.6 KW), and 48 Amp (11.5 KW), making it adaptable for various electric vehicles and other compatible devices. The compact size (8”x 6”x 4”) allows for easy installation near an electrical panel. The intelligent computer algorithm allows for extended “on” times. EV CHARGER SOLD SEPARATELY. Works with any Brand of EV Charger.

Versatile Charging Capability: The EVEMS240-100 -3R supports diverse Weatherproof EV charge rates ( for 60A to 100A Service Sizes) including 20/24 Amp (4.8/5.7KW), 30/32 Amp (7.2/7.68 KW), 40 Amp (9.6 KW), and 48 Amp (11.5 KW), making it adaptable for various electric vehicles and other compatible devices. The compact size (8”x 6”x 4”) allows for easy installation near an electrical panel. The intelligent computer algorithm allows for extended “on” times. EV CHARGER SOLD SEPARATELY. Works with any brand of EV Charger.
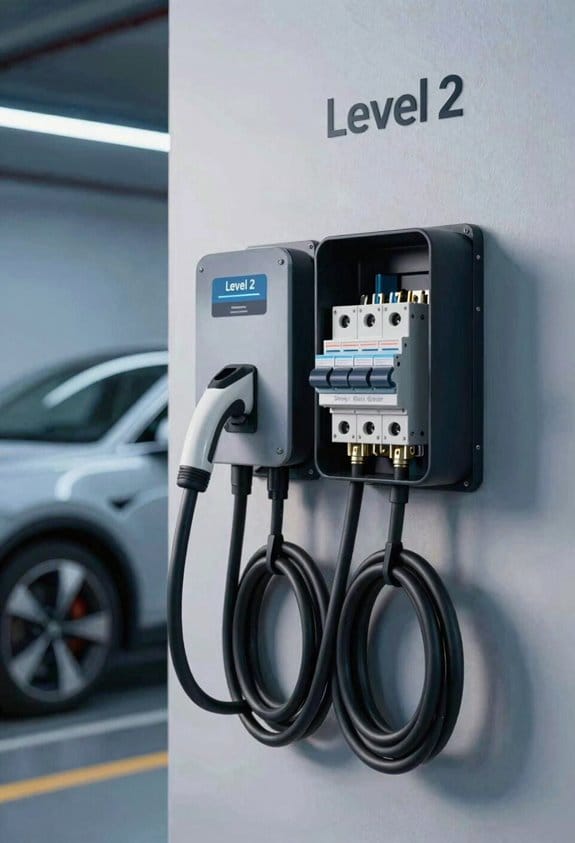
Circuit and Breaker
- Use a dedicated 240 V line.
- Install a GFCI‑protected breaker sized for the charger’s amperage.
Grounding
- Connect all metal parts to a grounding electrode.
- Run a grounding conductor back to the service panel.
Clearances
- Keep at least 3 ft from flammable storage.
- Provide ventilation for battery heat.
Labeling
- Mark the EV circuit on the panel.
- Post a warning sign near the charger.
Frankly, the biggest mistake I made was overlooking the clearance rules. I thought a foot of space was enough, but the code insists on three feet from anything that could catch fire. Once I moved the storage boxes aside, the installer could finish the job in a single day.
Worth knowing: a GFCI‑protected breaker isn’t just a nice‑to‑have; it’s a must for safety and code compliance. If you skip it, you could end up with a costly re‑inspection later.
Try this: before you call an electrician, sketch a simple layout of your garage. Mark where the charger will sit, where the panel is, and any shelves or tools you have. This visual helps the pros spot potential clearance issues early on.
If you follow these steps, you’ll keep your garage safe, stay within code, and avoid future headaches. Ready to get your charger up and running?
Step‑by‑Step Guide to Installing Modular Walls for EV Charging Zones

Ever wonder why your garage feels cramped when you try to set up an EV charger? I’ve been there, and the trick is getting the walls right before you bring in the power gear. Below is the step‑by‑step rundown that helped me turn a messy space into a tidy charging zone.
1. Measure the space. Mark where the wall will sit.
2. Choose panels with built‑in Wall Reinforcement.
3. Attach the base track to studs using heavy‑duty screws.
4. Snap panels onto the track.
5. Add Impact Shielding to protect cables and equipment.
6. Secure panels with the supplied brackets.
7. Install power outlets and conduit behind the wall.
8. Test the charger connection.
- Use a level for each panel.
- Keep clearances for ventilation.
- Follow local code for grounding.
Frankly, the biggest mistake I saw was skipping the level check; the panels end up crooked and the whole look falls apart. Worth knowing: a quick level check after each panel saves you a lot of re‑work later.
If you’re worried about getting the wiring right, remember to run the conduit before you snap the panels shut. That way you can pull the cables through without forcing anything. Keep a clear path for airflow—your charger will thank you on hot days. And don’t forget to double‑check that every grounding screw is tight; a loose ground can cause real trouble.
Try this: start at one corner and work your way around, snapping each panel into place before moving on. It keeps the process smooth and lets you spot any mis‑alignments early. When you finish, give the whole setup a quick test run. Plug in the charger, watch the indicator lights, and make sure the outlet stays cool.
You’ll end up with a clean, safe charging area that looks like it was built by a pro. Ready to give your garage the upgrade it deserves?
Recommended Products


Fast Charging Without Upgrades: Overcome limited electricity service and charge at the maximum speed possible, without upgrading your panel—thanks to Emporia’s PowerSmart technology that works with your existing electrical panel to automatically balance load.

Universal Compatibility: This EV charger cover is not only compatible with Tesla, it is also compatible with most other electric vehicle chargers. Providing solutions for all electric vehicle owners
Vertical‑Lift Solutions for Heavy Garage EV Charging Gear
Ever tried to wrestle a bulky charger out from under a pile of boxes? It’s a pain, and it can turn a quick plug‑in into an awkward stretch. I’ve been there, and I found a simple way to keep those heavy chargers off the floor and within easy reach.
First, check your roof’s load capacity. You don’t want to overload the structure, so a quick inspection or a chat with a contractor will tell you what you can safely support. Next, pick a motorized hoist rated for at least 250 lb. That gives you a comfortable safety margin for most chargers and any extra gear.
Now for the ceiling conveyor. Run a track parallel to the wall, then secure it with heavy‑duty brackets. Attach a hook to the hoist for each charger, and you’ll be able to pull the unit up to eye level with a single button press. The conveyor moves equipment along the roof line, freeing up floor space for cars, tools, or just a cleaner garage.
- Secure the track with heavy‑duty brackets.
- Attach a hook to the hoist for each charger.
- Test the lift before daily use.
Frankly, a safety lock on each hoist is a must. Keep the conveyor clear of debris, and you’ll avoid jams that could damage the system. This setup not only saves space but also cuts down on the bending and strain that come with lugging heavy gear around.
Try this: after you’ve installed the hoist and conveyor, run a quick test cycle. Pull a charger up, let it sit at eye level, then lower it back down. If everything moves smoothly, you’re good to go. If you hear any squeaks or notice wobbling, tighten the brackets before you start using it daily.
The result? A garage that feels more like a workspace and less like a storage closet. You’ll spend less time wrestling with equipment and more time getting your EV ready to roll. Ready to give your garage a lift?
Recommended Products

Powerful Lifting Performance: This electric chain hoist lifts up to 4400lbs (2 T) with a 2-chain design for balanced strength and a 20ft lift height. The hoist 3-phase 208–240V/440–480V, 60Hz power for industrial lifting and horizontal load movement

4400 lbs Load Capacity: Our electric chain hoist is equipped with a G100 chain to provide a safe lifting capacity of 4400 lbs/2 ton. It can lift all kinds of heavy objects at a speed of 26 ft/min (7.9 m/min) with a maximum lifting height of 20 ft/6.1 m.

2200 lbs Load Capacity: Say hello to 2200 lbs of lifting power! Our electric chain hoist comes with a top-grade DT carburized chain for durability and strength. Plus, with a 20 ft (6 m) lifting height, it's flexible enough for any space.
Designing a Garage Utility Hub: Power, Ventilation, and Safety for EV Charging
Ever had your garage feel more like a cluttered workshop than a safe place to charge your EV? You’re not alone—turning that space into a practical utility hub takes a bit of planning, but it’s totally doable.
First, take a look at your main panel. If it’s already close to its limit, you’ll need to upgrade the service or add a dedicated circuit just for the charger. That way you won’t overload anything, and the charger gets the power it needs without tripping breakers.
Next, think about heat. Install a few thermal‑monitoring sensors near where the battery sits and around the charger. If something starts to overheat, you’ll get an early warning before a problem spirals out of control. It’s a small step that makes a big difference.
Now, sort out where everything lives. Keep tools and chemicals on one wall, the EVSE on another, and leave a clear zone for the charging station itself. This separation helps you avoid accidental spills or damage to the charger, and it makes the space feel less cramped.
Good ventilation is a must. Add an exhaust fan or two, and consider a vented ceiling if your garage is airtight. Fresh air will carry away any heat or fumes, keeping the area cooler and safer for both you and the car.
Here’s the trick: use fire‑rated wiring for all the new circuits. It’s a little extra cost, but it gives you peace of mind that the wiring can handle the load without a risk of fire.
Steps to follow
- Upgrade electrical service.
- Add thermal monitoring.
- Separate equipment zones.
- Install exhaust fans.
- Use fire‑rated wiring.
These actions keep the garage safe and ready for EV charging. Got a favorite tip for keeping a garage tidy? Share it below!
Recommended Products

QuietCool advanced whole house fans use and improve upon the principle of ventilation cooling with savings off traditional cooling methods such as A/C

QuietCool advanced whole house fans use and improve upon the principle of ventilation cooling off traditional cooling methods such as A/C

QuietCool advanced whole house fans use and improve upon the principle of ventilation cooling with savings off traditional cooling methods such as A/C
Future‑Proof Your Garage for E‑Vehicles and Beyond
Ever wondered why your garage feels cramped the minute you bring home an electric car? You’re not alone—many homeowners hit that snag when they try to add a charger, extra storage, and a workspace all at once. The good news is you can set things up now so you won’t have to tear down walls later.
First off, look at your electrical panel. If it’s already a 100‑amp model, you’re probably safe for a single charger, but a 200‑amp panel gives you room to grow. Adding a dedicated 40‑amp circuit for the charger is a smart move, and it won’t hurt to have a spare slot for future gadgets. A quick call to a licensed electrician can clear up any doubts and save you a headache down the road.
Next, think about the wall where the charger will sit. Reinforcing that spot with extra studs or a metal bracket makes the whole setup sturdier. You’ll also want some ventilation—electric chargers can get warm, so a little airflow helps keep everything cool. While you’re at it, leave a few inches of open space around the unit for easy access and any upgrades that might come later.
When it comes to storage, go for slatwall panels and rail systems that let you move things around. Modular shelving is a lifesaver; you can swap out bins, hooks, or even a workbench without a major remodel. Ceiling racks are perfect for seasonal gear like holiday décor or camping gear, keeping the floor clear for your car and any new equipment you might add.
Here’s the trick: zone the garage into three clear areas—an EV bay, a workshop, and a hobby corner. That way each space has its own purpose and you won’t end up tripping over tools while trying to plug in your car. A simple line of tape or a rug can mark the boundaries without looking too industrial.
Electrical – Upgrade panel, add dedicated circuit for charger.
Structural – Reinforce wall where charger mounts, plan for ventilation.
Storage – Use slatwall panels, rail systems, and vertical racks.
Zoning – Separate EV bay, workshop, and hobby zones.
These steps set you up with a garage that can handle today’s tech and tomorrow’s surprises. Ready to make the most of your space? Let’s get started.
Frequently Asked Questions
How Do I Protect Garage Walls From EV Charger Impact Damage?
We’ll treat your garage like a Victorian conservatory, installing rubber bumpers and impact‑resistant paint to shield walls from charger collisions, reinforcing studs, and adding a protective metal backing for lasting durability.
What Ventilation Rating Is Needed for a Combined Battery and Tool Area?
We recommend a minimum CFM rate of 150 for a combined battery and tool area, so we suggest battery ventilation at 150 CFM and tool ventilation at 150 CFM to meet safety and code standards.
Can Modular Wall Panels Support Both EV Charging and Heavy‑Duty Tool Storage?
We can install modular wall panels that handle both EV charging and heavy‑duty tool storage, thanks to their modular compatibility and built‑in load distribution, ensuring power and weight are safely managed.
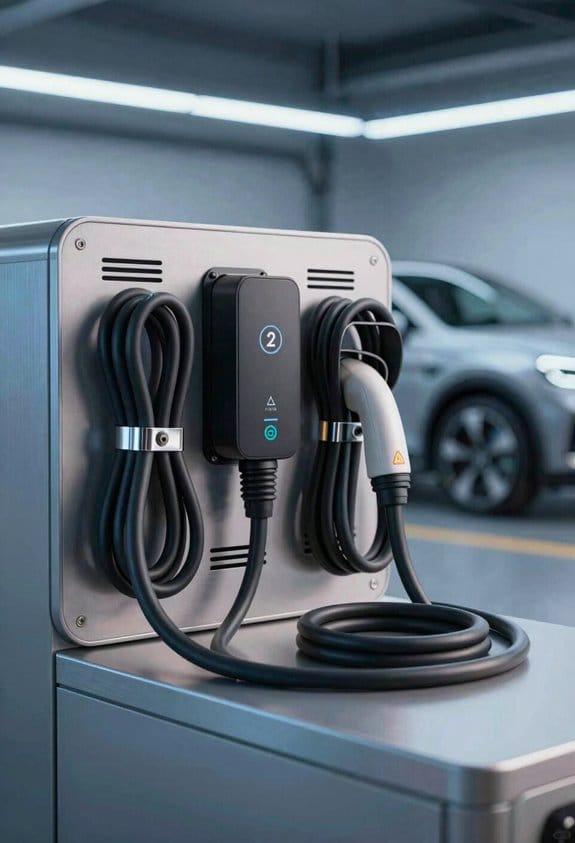
What Is the Best Way to Route Cables for Multiple EV Charging Bays?
We recommend installing overhead raceways from a central conduit hub, then branching individual conduits to each bay; this keeps wiring tidy, protects cables, and simplifies future expansions.
How Many Amperes Should My Main Panel Accommodate for Future EV Upgrades?
We recommend sizing your main panel for at least 200 amps, allowing headroom for load forecasting and future EV upgrades; this electrical capacity guarantees you won’t outgrow the system as charging demands increase.